Since the ASTRA controller is based on the ESP32 microcontroller, ESPHome is used for connecting to Home Assistant. ESPHome firmware will allow you to integrate ASTRA with HASS or Node-Red, as well as configure the embedded automatization of the controller to work without external control
Getting Started with ESPHome and Home Assistant
In this guide, we’ll go through how to install ESPHome on an ASTRA device using the ESPHome Dashboard, installed as a Home Assistant add-on.
If you do not have the ESPHome on your Home Assistant, you can install with this instruction https://esphome.io/guides/getting_started_hassio.html
Have 2 ways to migrate from TASMOTA to ESPHome:
- You just need to have ESPHome create a binary for you and then upload that in the Tasmota web interface. https://esphome.io/guides/migrate_sonoff_tasmota.html
- Initial installation from ESPhome (recommend): to the new ESPHome device. Installation requires that your ESP device is connected with a USB-UART adapter to a computer. Later updates can be installed wirelessly OTA. How to connect USB-UART adapter to ASTRA controller. https://rocketcontroller.com/programming-astra-module-with-uart-serial-interface-for-arduino-ide-micropython-and-any-programming-language/
Basic functions of ASTRA controller:
- WiFi setting.
- LED status. Basic functions and WiFi, BLE, MQTT connecting status.
- Buzzer. Initialization and play ringtones.
- Outputs – Relays/SSR/MOSFET. I/O settings.
- Inputs. Binary sensors. I/O settings.
- Automatization.
- RF433/315-receiver. Optional module. Initialization. sniffing RF codes. Automatization
WiFi
This core ESPHome component sets up WiFi connections to access points for you. You need to have a network configuration (either Wifi or Ethernet) or ESPHome will fail in the config validation stage. You also can’t have both Wifi and Ethernet setup in the same time (even if your ESP has both wired).
It’s recommended to provide a static IP for your node, as it can dramatically improve connection times.
! We recommended using the secrets of the WiFi credential in secrets.YAML (ESPhome folder)
Access Point Mode
ESPHome has an optional “Access Point Mode”. If you include ap: in your wifi configuration, ESPHome will automatically set up an access point that you can connect to. Additionally, you can specify both a “normal” station mode and AP mode at the same time. This will cause ESPHome to only enable the access point when no connection to the WiFi router can be made.
More info: https://esphome.io/components/wifi.html#
Status LED
The status_led (LED with WiFi symbol on front panel) hooks into all ESPHome components and can indicate the status of the ASTRA device. Specifically, it will:
- Stay ON. All functions and components work, WiFi/BLE/MATT connected.
- Blink slowly (about every second) when a warning is active. Warnings are active when for example reading a sensor value fails temporarily or the WiFi/MQTT connections are disrupted.
- Blink quickly (multiple times per second) when an error is active. Errors indicate that ESPHome has found an error while setting up. In most cases, ESPHome will still try to recover from the error and continue with all other operations.
- Stay OFF otherwise.
Note! When using this platform the high-level status_led component should not be included (at least over the same pin), as its functionality is directly provided by this platform. The only difference is that the platform won’t be loaded in OTA safe mode, while the component would be. If your device has a single LED that needs to be shared use status_led light platform instead.
More info: https://esphome.io/components/status_led.html?highlight=led+status#
Buzzer
ASTRA controller has sound piezo Buzzer. To connect Buzzer to ESPHome, need to use the component Buzzer rtttl, with this component allows you to easily play monophonic songs (ringtones) or any sounds like an alarm. It accepts the Ring Tone Text Transfer Language, rtttl format (Wikipedia) which allows to the storage of simple melodies.
You can find many rtttl strings online on the web.
Also, you can try to use this:
Initialization:
Plays an rtttl tone:
For example, add a ringtone to the startup of the device:
More info: https://esphome.io/components/rtttl.html?highlight=rtttl
OUTPUTS – GPIO Switch. Relays/SSR/MOSFET.
The gpio switch platform allows you to use any pin on your node as a switch. You can for example hook up a relay to a GPIO pin and use it through this platform.
Interlocking
In some cases, it is necessary to ensure that two outputs are never active at the same time. ESPHome has a feature to prevent two GPIO Switches from being active at the same time called interlocking. Just give each switch in the “interlocking group” an interlock option with a list of all the switches in the group.
more info: https://esphome.io/components/switch/gpio.html
INPUTS. Binary Sensor. Switches, sensors
With ESPHome you can use different types of binary sensors. They will automatically appear in the Home Assistant front-end and have several configuration options. The triggers for binary sensors in ESPHome can to use for embedded automatization or with Home Assistant global automatization. For example, a press is triggered in the first moment when the button on your mouse is pushed down.
More info: https://esphome.io/components/binary_sensor/index.html?highlight=binary_sensor#
RF433/315 receiver.
ASTRA control has an inner socket for connecting an RF433/315 receiver or transmitter. The module itself is not included, you can purchase it on the website or from any other seller. The module connector is standard, and it will not be difficult to install it. This allows you to receive and transmit RF433/315 signals like those used by wireless wall switches, wireless keyfobs, TV remote controls, or many home security/alarm devices and sensors. In this guide, we will show, how to connect a wireless wall switch to an ASTRA device, and automate relay switching. First, need to sniff the RF-code from the switch. So that the controller can respond to its dedicated signal.
Now we can start sniffing RF codes. Open ESPhome log console. Trigger an RF code for your device by pressing a button or activating your devices works and in the logs, you will get something like this:
There is the information we need to take note of, the “data” and the protocol. The data is the unique code that the sensor or device is transmitting, in binary form.
Repeat this process for each device you want to integrate with.
Using this information, we can add sensors to ESPHome.
Adding binary sensors to ESPHome
With the sniffed codes obtained above, we can add them as binary sensors to ESPHome, the following to your existing configuration.
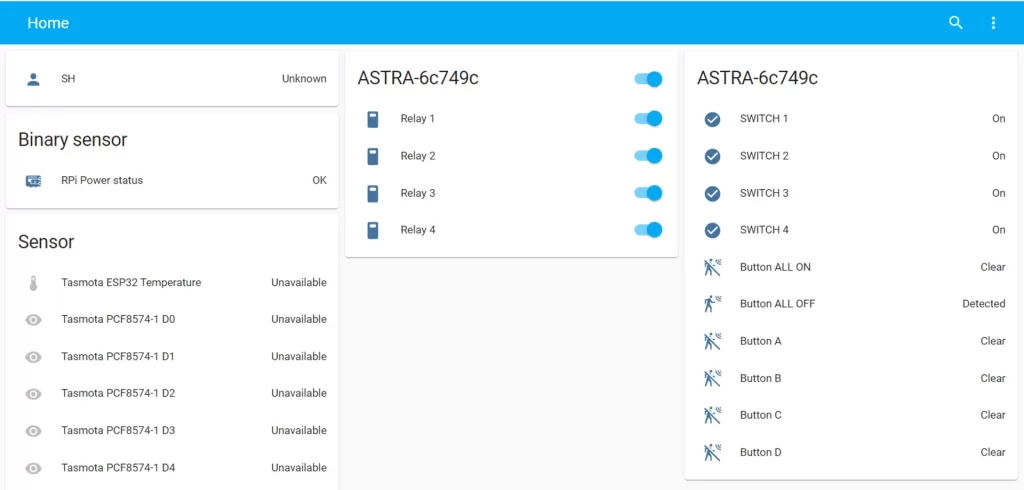
In this example, we have 6 switches:
- 4 switches dedicate to 4 relays
- 1 switch do ON all relays
- 1 switch do OFF all relays
more info: https://esphome.io/components/remote_transmitter.html#remote-setting-up-infrared
Conclusion. Sample code.
You should now be able to fully integrate Home Assistant and ESPHome with your ASTRA controller and use it for your projects or home automatization.
If you have any issues, let us know in the comments, and be sure to subscribe below for instant updates of new topics.